Friday, May 30, 2008

Configuring Cisco HWIC-3G

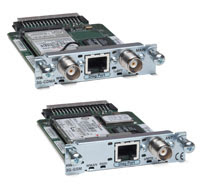
Some people asked me about configuring HWIC-3G-GSM or HWIC-3G-CDMA module. To read more information about these modules, you can open this link http://www.cisco.com/go/3g

Basically, Cisco 3G Wireless WAN HWIC provides a cost-effective alternative to ISDN dial back up and provides Business Continuity for critical applications.
  • Offers Broadband data rates up to 3.2 Mbps with EVDO and 3.6 Mbps with HSDPA
  • Supports CDMA and GSM/UMTS standards (EVDO Rev A / HSDPA)
  • Target Applications – WAN Backup, Rapid Deployment, Portable Applications
  • Supported on Cisco 1841 / 2800 / 3800 Series Routers
  • Embedded mini PCI express Cellular modem from Sierra Wireless
  • Modem firmware is upgradeable, it is not bundled with IOS
  • Multiple external antenna options for in-building deployments

Firmware

Sierra Wireless modem firmware is not bundled with IOS. Modem firmware upgrade may be required for bug fixes and enhancements

Search for new firmware here: http://www.cisco.com/kobayashi/sw-center/sw-wireless.shtml

IOS Commands to upgrade firmware:
microcode reload cellular cdma modem-provision
where pa-bay is 0 for HWIC, slot is the slot number where the 3G HWIC is plugged in (0-3).

Note: The firmware is packaged as a TAR archive. After copying to router flash, use the following command to untar:
archive tar /xtract flash: flash:


HWIC Insertion and Recognition


Router#show version

1 Virtual Private Network (VPN) Module

1 Cellular interface

DRAM configuration is 64 bits wide with parity enabled.
479K bytes of NVRAM.


Router#show diag
WIC Slot 0:
3G WWAN HWIC-HSDPA/UMTS/EDGE/GPRS-850/900/1800/1900/2100MHz
...
Product (FRU) Number : HWIC-3G-GSM
Version Identifier : NA

Router#show run
!
interface Cellular0/0/0
no ip address
shutdown
!


Profile Configuration CLI


Up to 16 Profiles can be configured at one time, when no profile is selected, profile 1 is used.

GSM Profile configuration command:
cellular x/x/x gsm profile create [chap|pap] username passwd
cellular x/x/x gsm profile delete


Profile Selection
Using “ATDT*98*#”in the dialer chat script

Router# cellular 0/0/0 gsm profile create 1 ISP.CINGULAR chap ISP@CINGULARGPRS.COM CINGULAR1

Profile 1 = INACTIVE*
--------
PDP Type = IPv4, Header Compression = OFF
Data Compression = OFF

Access Point Name (APN) = ISP.CINGULAR

Authentication = PAP

Username: ISP@CINGULARGPRS.COM, Password: CINGULAR1


New Cellular Interface configuration

The new Cellular interface is an Async Serial interface and requires following configuration

PPP Configuration
encapsulation ppp
ppp chap hostname
ppp chap password
ppp ipcp dns request


Dialer Configuration:
async mode interactive
dialer in-band

IP Address configuration
ip address negotiated

Sample Configuration:

interface Cellular0/0/0
ip address negotiated
ip nat outside
encapsulation ppp
dialer in-band
dialer string gsm
dialer-group 1
async mode interactive
ppp chap hostname dummy
ppp chap password 0 dummy
ppp ipcp dns request
!


Dialer/Chat Scripts


ATDT*98*#
where profile-number could be 1-16 and represents
the modem profile to be used for the call.

Example chat script:
chat-script gsm “” “ATDT*98*2#” TIMEOUT 30 CONNECT

For default Profile 1, profile number can be left out in the chat script:
chat-script gsm “” “ATDT*98#” TIMEOUT 30 CONNECT


Configuration Examples
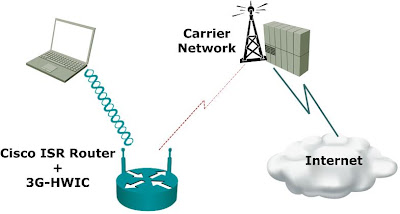


Here we have the 3G as the primary connection, we use Dynamic IP Address and the Router acting as a DHCP server. The laptop connects to the router via wireless, in the router we have HWIC-AP module installed.

dot11 ssid test
authentication open
!
ip dhcp pool wlan-client
network 10.4.0.0 255.255.0.0
default-router 10.1.0.1
dns-server 66.102.163.231 66.102.163.232
!
chat-script gsm "" "ATDT*99#" TIMEOUT 60 "CONNECT"
!
interface Dot11Radio0/2/0
no ip address
!
ssid test
!
bridge-group 104
!
interface Cellular0/0/0
ip address negotiated
ip nat outside
encapsulation ppp
dialer in-band
dialer string gsm
dialer-group 1
async mode interactive
ppp chap hostname cisco@wwan.ccs
ppp chap password 0 cisco
ppp ipcp dns request
!
interface bv1
ip address 10.4.0.1 255.255.0.0
ip nat inside
!
ip route 0.0.0.0 0.0.0.0 Cellular0/0/0
!
ip nat inside source list 10 interface Cellular0/0/0 overload
!
access-list 1 permit any
dialer-list 1 protocol ip list 1
!
line 0/0/0
exec-timeout 0 0
script dialer gsm
login
modem InOut
no exec
!


Sunday, May 25, 2008

How to Configure an Access Server for Lab

If you see CBT Nuggets, TrainSignal, Cisco Video Mentor, the instructors can change access between devices easily. That's where an Access Server comes into play.
Moving around to plug/unplug a console cable from one to another is tired every time you want to configure/access different device. The solution to this problem is purchasing and configuring an Access Server.
Remote labs from Internetwork Expert also use an Access Server for the labs at racks.internetworkexpert.com.

If the Async port is serial like 2511's picture below, you will need a special octal cable CAB-OCTAL-ASYNC Cable. But if the Access Server Async ports are in RJ-45, you will only need a basic UTP RJ-45-to-RJ-45 rollover cable.


Once you've got your AS and the appropriate cable, you're ready to configure your AS. Below is the example diagram on how to connect the AS with the devices, and then you will connect one of the RJ-45 connectors to the console port of each one of your devices that has console port. If you're using an octal cable, make sure to note the number that's on the cable itself right below the connector, because that's very important.


In the above example, we have an Access Server, 2 routers, 1 switch, and 1 ASA.
Router 1 (R1) will be plugged using 1st cable and it will be using port 2001, 2nd cable will be port 2002, etc.

Basically we only need to configure a loopback interface, an an ip host name and port that point to the loopback address. The basic configuration will be like this:
hostname AS
!
!
ip host ASA 2004 1.1.1.1
ip host S1 2003 1.1.1.1
ip host R2 2002 1.1.1.1
ip host R1 2001 1.1.1.1
!
!
interface Loopback0
ip address 1.1.1.1 255.255.255.255
no ip directed-broadcast
!
There are two ways to connect to devices attached to an access server, you can terminate your exec session on the access server itself (one terminal window for all sessions), or you can terminate your exec session on the device connected to the access server (one terminal window for each session).

When you terminate your exec session on the access server you then “reverse telnet” to the individual devices connected to the access server. Normally to do this you first login to the access server and then issue the “show hosts” command to see the host mappings. Next, reverse telnet to them by typing the hostname and pressing enter. To get back to the access server issue the escape sequence CTRL-SHIFT-6-X. To do so hold ctrl and shift, hit 6, release all keys, then hit X. From the access server you can then open new connections or resume connections that you already have open.

When you terminate your exec session on the device connected to the access server, i.e. by telnetting to the access server at port 2001, you cannot issue the escape sequence to reconnect to the access server. In this situation you would open multiple terminal windows if you wanted to connect to multiple devices.

In my office lab, I made it similar to internetwork expert racks lab. Using login local, and have multiple user plus a menu.

For more information watch this class-on-demand video on using an Access Server.

Reference:

Wednesday, May 7, 2008

Extract a file or copy a folder from TFTP to flash

Sometimes you need to copy a bunch of files or a folder or maybe extract an archive file to a Cisco device. For instance, you need to upgrade the IOS of your Cisco Catalyst Switch or Cisco Aironet Access Points. If you need to upgrade to a newer IOS, usually Cisco provides an archived IOS.
For example, a 1200 Aironet IOS image will be available like this in cisco.com: c1200-k9w7-tar.123-8.JA2.tar.
That is a bit different compared to a Cisco Router image that used to be a *.bin file.

If you extract the
c1200-k9w7-tar.123-8.JA2.tar file, then you will have the image with a name like this: c1200-k9w7-mx.123-8.JA2, with another couple of files.
You will need to copy all these files into your Access Point.

So how to copy the the image to the Access Point?
Do we need to copy it one by one from tftp using "copy tftp flash" command?
The answer is no, that's where the "archive tar" command comes into play.

The example below, I extract a c1200-k9w7-tar.123-8.JA2.tar
file from my TFTP server (192.168.3.250) to Cisco Aironet 's flash:
ap#archive tar /xtract tftp://192.168.3.250/c1200-k9w7-tar.123-8.JA2.tar flash:
Loading c1200-k9w7-tar.123-8.JA2.tar from 192.168.3.250 (via BVI1): !
extracting info (274 bytes)
c1200-k9w7-mx.123-8.JA2/ (directory) 0 (bytes)
c1200-k9w7-mx.123-8.JA2/html/ (directory) 0 (bytes)
c1200-k9w7-mx.123-8.JA2/html/level/ (directory) 0 (bytes)
c1200-k9w7-mx.123-8.JA2/html/level/1/ (directory) 0 (bytes)
extracting c1200-k9w7-mx.123-8.JA2/html/level/1/appsui.js (557 bytes)
extracting c1200-k9w7-mx.123-8.JA2/html/level/1/back.shtml (498 bytes)!
...
...
...
(output truncated)
...
...
...

c1200-k9w7-mx.123-8.JA2/html/level/15/ap_contextmgr_scm_summary.shtml.gz (5559 bytes)!

extracting c1200-k9w7-mx.123-8.JA2/c1200-k9w7-mx.123-8.JA2 (3654874 bytes)!!!!!!!!!!!!!!!!!!!!!!!!!!!!!!!!!!!!!!!!!!!!!!!!!!!!!!!!!!!!!!!!!!!!!!!!!!!!!!!!!!!!!!!!!!!!!!!!!!!!!!!!!!!!!!!!!!!!!!!!!!!!!!!!!!!!!!!!!!!!!!!!!!!!!!!!!!!!!!!!!!!!!!!!!!!!!!!!!!!!!!!!!!!!!!!!!!!!!!!!!!!!!!!!!!!!!!!!!!!!!!!!!!!!!!!!!!!!!!!!!!!!!!!!!!!!!!!!!!!!!!!!!!!!!!!!!!!!!!!!!!!!!!!!!!!!!!!!!!!!!!!!!!!!!!!!!!!!!!!!!!!!!!!!!!!!!!!!!!!!!!!!!!!!!!!!!!!!!!!!!!!!!!!!!!!!!!!!!!!!!!!!!!!!!!!!!!!!!!!!!!!!!!!!!!!!!!!!!!!!!!!!!!!!!!!!!!!!!!!!!!!!!!!!!!!!!!!!!!!!!!!!!!!!!!!!!!!!!!!!!!!!!!!!!!!!!!!!!!!!!!!!!!!!!!!!!!!!!!!!!!!!!!!!!!!!!!!!!!!!!!!!!!!!!!!!!!!!!!!!!!!!!!!!!!!!!!!!!!!!!!!!!!!!!!!!!!!!!!!!!!!!!!!!!!!!!!!!!!!!!!!!!!!!!!!!!!!!!!!!!!!!!!!!!!!!!!!!!!!!!!!!!!!!!!!!!!!!!!!!!!!!!!!!!!!!!!!!!!!!!!!!!!!!!!!!!!
extracting c1200-k9w7-mx.123-8.JA2/5001.img (131328 bytes)!!!!!!!!!!!!!!!!!!!!!!!!!!
extracting c1200-k9w7-mx.123-8.JA2/5101.img (131328 bytes)!!!!!!!!!!!!!!!!!!!!!!!!!
extracting c1200-k9w7-mx.123-8.JA2/6301.img (131328 bytes)!!!!!!!!!!!!!!!!!!!!!!!!!!
extracting c1200-k9w7-mx.123-8.JA2/6701.img (131328 bytes)!!!!!!!!!!!!!!!!!!!!!!!!!!
extracting c1200-k9w7-mx.123-8.JA2/6701_cal.img (131328 bytes)!!!!!!!!!!!!!!!!!!!!!!!!!!
extracting c1200-k9w7-mx.123-8.JA2/info (274 bytes)
extracting info.ver (274 bytes)!
[OK - 5017600 bytes]
This is just a trick. To upgrade an IOS/image of a Cisco device, you can use the archive download-sw command or use the web GUI (for Cisco Aironet Access Point).