Here I will explain about configuring a Cisco Catalyst Switch
- Preparation to Configure a Switch
- Basic Switch Configuration:
- Management Interface Considerations
- Configure Management Interface
- Configure Default Gateway
- Verify Configuration
- Configure Duplex and Speed
- Configure a Web Interface
Prepare to Configure the Switch
The initial startup of a Catalyst switch requires the completion of the following steps:
Step 1. Before starting the switch, verify the following:
All network cable connections are secure.
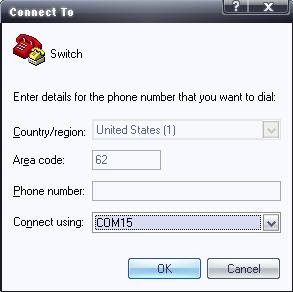
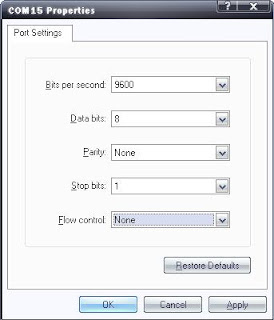
Your PC or terminal is connected to the console port. Your terminal emulator application, such as HyperTerminal is running and configured properly. The figure shows a PC connected to a switch using the console port.
The figure below shows the correct configuration of HyperTerminal, which can be used to view the console of a Cisco device. In here I'm using a USB-to-RS232 converter the driver make a new Serial Port COM 15. If your PC or Laptop already has a Serial Port it should be COM 1.


Step 2. Attach the power cable plug to the switch power supply socket. The switch will start. Some Catalyst switches, including the Cisco Catalyst 2960 series, do not have power buttons.
Step 3. Observe the boot sequence as follows:
When the switch is on, the POST begins. During POST, the LEDs blink while a series of tests determine that the switch is functioning properly. When the POST has completed, the SYST LED rapidly blinks green. If the switch fails POST, the SYST LED turns amber. When a switch fails the POST test, it is necessary to repair the switch.
Observe the Cisco IOS software output text on the console.
The Boot Process on console should be like this:
Copyright (c) 1986-2006 by Cisco Systems, Inc,.
Compiled Fri 28-Jul-06 04:33 by yenanh
Image text-base: 0x0o003000, data—base: OxOOAA2F34
flashfs[l]: 602 files, 19 directories
flashfs[1]: 0 orphaned files, 0 orphaned directories flashfs[1r]: Tota1 bytes: 32514048
flashfs[1]: Bytes used: 7715328
flashfs[1]: Bytes available: 24798720
flashfs[1]: flashfs fsck took 1 seconds.
flashfs[1]: Initia1ization complete....done Initia1izing flashfs.
POST: CPU MIC register Tests : Begin
POST: CPU MIC register Tests : End, status Passed
POST: PortASIC Memory Tests : Begin
POST: PortASIC Memory Tests : End, Status Passed
POST: CPU MIC PostASIC interface Loopback Tests : Begin
POST: CPU MIC PostASIC interface Loopback Tests : End, Status Passed
POST: PostASIC RingLoopback Tests : Begin
POST: PostASIC RingLoopback Tests : End, Status Passed
POST: PostASIC CAM Subsystem Tests: Begin
During the initial startup of the switch, if POST failures are detected, they are reported to the console and the switch does not start. If POST completes successfully, and the switch has not been configured before, you are prompted to configure the switch.
Management Interface ConsiderationsAn access layer switch is much like a PC in that you need to configure an IP address, a subnet mask, and a default gateway. To manage a switch remotely using TCP/IP, you need to assign the switch an IP address. In the figure, you want to manage S1 from PC1, a computer used for managing the network. To do this, you need to assign switch S1 an IP address. This IP address is assigned to a virtual interface called a virtual LAN (VLAN), and then it is necessary to ensure the VLAN is assigned to a specific port or ports on the switch.
The default configuration on the switch is to have the management of the switch controlled through VLAN 1. However, a best practice for basic switch configuration is to change the management VLAN to a VLAN other than VLAN 1. The implications and reasoning behind this action are explained in the next chapter. The figure illustrates the use of VLAN 99 as the management VLAN; however, it is important to consider that an interface other than VLAN 99 can be considered for the management interface.
Configure Management InterfaceTo configure an IP address and subnet mask on the management VLAN of the switch, you must be in VLAN interface configuration mode. Use the command interface vlan 99 and enter the ip address configuration command. You must use the no shutdown interface configuration command to make this Layer 3 interface operational. When you see "interface VLAN x", that refers to the Layer 3 interface associated with VLAN x. Only the management VLAN has an interface VLAN associated with it.
Note that a Layer 2 switch, such as the Cisco Catalyst 2960, only permits a single VLAN interface to be active at a time. This means that the Layer 3 interface, interface VLAN 99, is active, but the Layer 3 interface, interface VLAN 1, is not active.
Here is the Cisco IOS CLI Command Syntax:
S1#configure terminal
S1(config)#interface vlan 99
S1(config-if)#ip address 172.17.99.11 255.255.0.0
S1(config-if)#no shutdown
S1(config-if)#end
S1#configure terminal
S1(config)#interface fastethernet 0/18
S1(config-if)#switchport mode access
S1(config-if)#switchport acces vlan 99
S1(config-if)#end
S1#copy running-config startup-config
Configure Default Gateway You need to configure the switch so that it can forward IP packets to distant networks. The default gateway is the mechanism for doing this. The switch forwards IP packets with destination IP addresses outside the local network to the default gateway. In the figure, router R1 is the next-hop router. Its IP address is 172.17.99.1.
To configure a default gateway for the switch, use the
ip default-gateway command. Enter the IP address of the next-hop router interface that is directly connected to the switch where a default gateway is being configured. Make sure you save the configuration running on a switch or router. Use the
copy running-config startup-config command to back up your configuration.
Verify ConfigurationHere is an abbreviated screen output showing that VLAN 99 has been configured with an IP address and subnet mask, and Fast Ethernet port F0/18 has been assigned the VLAN 99 management interface:
S1#show running-config
...
!
interface FastEthernet0/18
switchport access vlan 99
switchport mode access
...
!
interface Vlan99
ip address 172.17.99.11 255.255.255.0
no-ip route cache
!
Show the IP InterfacesUse the
show ip interface brief to verify port operation and status. Y
The
mdix auto Command
You used to be required to use certain cable types (cross-over, straight-through) when connecting between specific devices, switch-to-switch or switch-to-router. Instead, you can now use the
mdix auto interface configuration command in the CLI to enable the automatic medium-dependent interface crossover (auto-MDIX) feature.
When the auto-MDIX feature is enabled, the switch detects the required cable type for copper Ethernet connections and configures the interfaces accordingly. Therefore, you can use either a crossover or a straight-through cable for connections to a copper 10/100/1000 port on the switch, regardless of the type of device on the other end of the connection.
The auto-MDIX feature is enabled by default on switches running Cisco IOS Release 12.2(18)SE or later. For releases between Cisco IOS Release 12.1(14)EA1 and 12.2(18)SE, the auto-MDIX feature is disabled by default.
Configure Duplex and SpeedYou can use the
duplex interface configuration command to specify the duplex mode of operation for switch ports. You can manually set the duplex mode and speed of switch ports to avoid inter-vendor issues with autonegotiation. Although there can be issues when you configure switch port duplex settings to
auto, in this example, S1 and S2 switches have the same duplex settings and speeds. The figure describes the steps to configure the port F0/1 on the S1 switch.
Here is the Cisco IOS CLI Command Syntax:
S1#configure terminal
S1(config)#Interface fastethernet 0/1
S1(config-if)#duplex auto
S1(config-if)#speed auto
S1(config-if)#end
S1#copy running-config startup-config
Configure a Web InterfaceModern Cisco switches have a number of web-based configuration tools that require that the switch is configured as an HTTP server. These applications include the Cisco web browser user interface, Cisco Router and Security Device Manager (SDM), and IP Phone and Cisco IOS Telephony Service applications.
To control who can access the HTTP services on the switch, you can optionally configure authentication. Authentication methods can be complex. You may have so many people using the HTTP services that you require a separate server specifically to handle user authentication. AAA and TACACS authentication modes are examples that use this type of remote authentication method. AAA and TACACS are authentication protocols that can be used in networks to validate user credentials. You may need to have a less complex authentication method. The enable method requires users to use the server's enable password. The local authentication method requires the user to use the login username, password, and privilege level access combination specified in the local system configuration (by the username global configuration command).
Here is the Cisco IOS CLI Command Syntax:
S1#configure terminal
S1(config)#ip http authentication enable
S1(config)#ip http server
S1(config)#end
More information on
TACACS.More information on
AAA.
References:
 SAN JOSE, Calif., Jan. 28, 2008 - Cisco® announced today an innovative family of data center-class switching platforms, the Cisco Nexus Series, to meet customer demands for next-generation mission-critical data centers. As the data center transitions to a more services-centric model, the network plays a pivotal role in orchestrating virtual IT resources and scaling workloads. The Cisco Nexus 7000 Series was designed with this environment in mind, delivering the infrastructure chapter of Cisco's Data Center 3.0 vision.


